Probleem met grafische kaart niet gedetecteerd in Windows 10 Fix
Bijgewerkt in januari 2024: Krijg geen foutmeldingen meer en vertraag je systeem met onze optimalisatietool. Haal het nu op - > deze link
- Download en installeer de reparatietool hier.
- Laat het uw computer scannen.
- De tool zal dan repareer je computer.
Als je een grote fan bent van videogames of animaties, zal het zien van de fout, Grafische kaart niet gedetecteerd, je zeker teleurstellen.Een grafische kaart in uw laptop geeft een beeld weer op uw monitor voor een betere weergavekwaliteit.Voor een rijkere game-ervaring, betere prestaties in 3D-applicaties en -software en voor een betere video- en HD-ervaring, investeren we meestal in een geweldige grafische kaart.Onder bepaalde omstandigheden kan uw systeem de grafische kaart mogelijk niet herkennen.
Er zijn verschillende redenen die tot deze fout kunnen leiden.Een defecte grafische kaart, defecte stuurprogramma's, problemen met de GPU-sleuf of onjuiste BIOS-instellingen kunnen een van de vele redenen zijn.Onvoldoende stroomvoorziening kan ook een oorzaak zijn.Het kan zijn dat uw systeem de grafische kaart niet detecteert bij het plaatsen van een nieuwe of dat het de bestaande niet meer detecteert.
Lees dit artikel door om erachter te komen hoe u dit probleem kunt oplossen.
Belangrijke opmerkingen:
U kunt nu pc-problemen voorkomen door dit hulpmiddel te gebruiken, zoals bescherming tegen bestandsverlies en malware. Bovendien is het een geweldige manier om uw computer te optimaliseren voor maximale prestaties. Het programma herstelt veelvoorkomende fouten die kunnen optreden op Windows-systemen met gemak - geen noodzaak voor uren van troubleshooting wanneer u de perfecte oplossing binnen handbereik hebt:
- Stap 1: Downloaden PC Reparatie & Optimalisatie Tool (Windows 11, 10, 8, 7, XP, Vista - Microsoft Gold Certified).
- Stap 2: Klik op "Start Scan" om problemen in het Windows register op te sporen die PC problemen zouden kunnen veroorzaken.
- Stap 3: Klik op "Repair All" om alle problemen op te lossen.

FIX 1: Controleer op verborgen apparaten
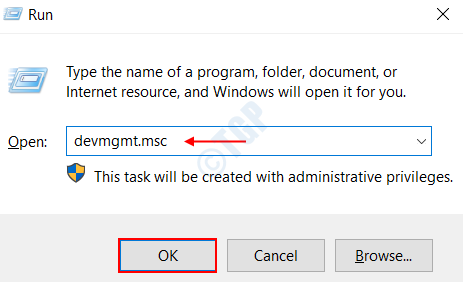
Stap 1: Open Apparaatbeheer op Windows 10.Open hiervoor het dialoogvenster Uitvoeren door tegelijkertijd op de Windows- en R-toetsen te drukken.
Stap 2: Typ devmgmt.msc in het tekstvak zoals hieronder weergegeven.Hierdoor wordt het venster Apparaatbeheer geopend.
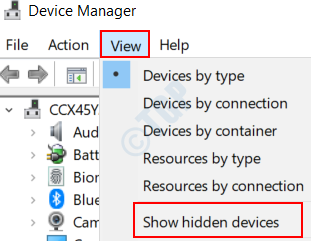
Stap 3: Klik op het tabblad Weergave in het geopende venster.Kies nu de optie Verborgen apparaten weergeven uit de lijst.
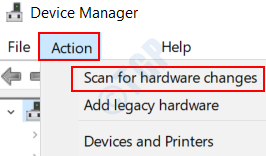
Stap 4: Navigeer nu naar het tabblad Actie en klik erop.Kies de optie Scannen op hardwarewijzigingen in de lijst die wordt geopend.
Stap 5: Controleer of het stuurprogramma van uw grafische kaart onder Beeldschermadapters is.Als het verschijnt, ben je klaar om te gaan.
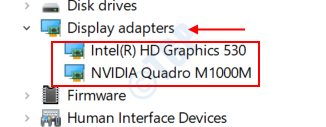
If you dont see the graphics card under Display Adapters, get on to the next fix.
FIX 2 : Check the Graphics Card Slot
The Graphics Card slot that resides inside your motherboard can be a cause of concern in many cases. They may have become faulty all of a sudden due to current and voltage issue. In order to check out for the GPU slot in your system, follow the below given steps.
Step 1 : Turn off your PC.
Step 2 : Open up the back cover of your PC or laptop.
Step 3 : Take a look on to the motherboard and Graphics card slots, like the PCI Express x16 slots.. Turn on the PC and check if the fan associated with the graphics card is running.
Step 4 : If the fan is running, then there isn’t an issue with the slot. Else, try inserting the graphics card in any other slot available, like the AGP slot. Check if the fan runs on turning on the PC.
Step 5 : There are chances that multiple slots might be faulty. Try each of them.
Step 6 : In case if none of the graphics card work on the slot, you may have to consider replacing the motherboard.
FIX 3 : Uninstall Windows Updates
Installing new windows updates may have introduced this bug and may have messed up with your drivers and other inbuilt settings. If you had updated your Windows less than a week ago, then there is an option to uninstall it. To do so, follow the below given steps .
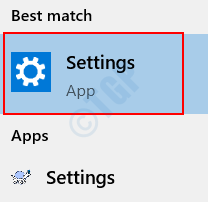
Step 1 : Search for the Settings menu from the Windows Search bar and click on it.
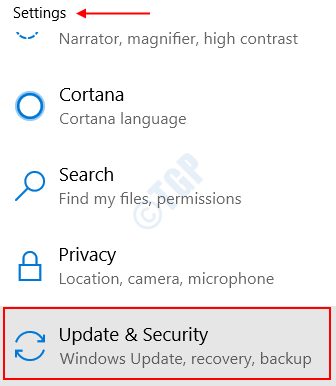
Step 2 : Click on the option Update and Security.
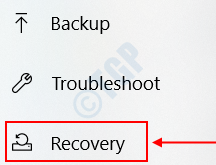
Step 3 : In the Settings page that opens up, click on the option Recovery on the left pane.
Step 4 : You will find a feature named Go back to an Earlier Build. Click on the option Get Started and follow the instructions provided.

Houd er rekening mee dat deze optie grijs kan zijn als u geen recente Windows-update hebt uitgevoerd.Ga verder met de volgende oplossing als uw probleem hiermee niet is opgelost.
FIX 4: Standaard grafische kaart instellen
Als u de grafische kaart van NVIDIA in uw systeem hebt geïnstalleerd, kunt u de onderstaande stappen volgen om de grafische kaart in uw systeem in te stellen op het gebruik van de standaardkaart.
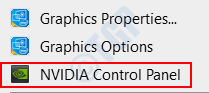
Stap 1: Klik met de rechtermuisknop op uw bureaublad en kies de optie NVIDIA Control Panel.
Stap 2: Klik in het geopende venster op het tabblad 3D-instellingen.
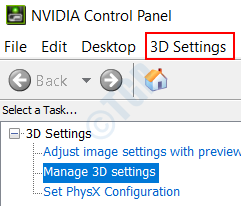
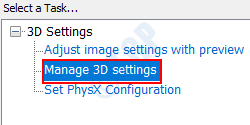
Stap 3: In het linkerdeelvenster vindt u de optie Beheer 3D-instellingen onder 3D-instellingen.Klik erop.
Stap 4: Klik op het tabblad Programma-instellingen in het rechterdeelvenster.
Stap 5: Kies nu het programma waarvoor u de grafische kaart wilt gebruiken.U kunt dit doen door het programma te kiezen in de vervolgkeuzelijst onder Selecteer een programma om aan te passen sectie.
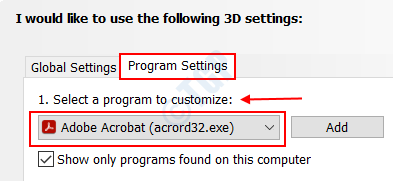
In mijn geval heb ik Adobe Acrobat geselecteerd als mijn programma dat moet worden aangepast.
Stap 6: Klik onder de sectie Selecteer de gewenste grafische processor voor dit programma op de vervolgkeuzelijst en kies de optie Algemene instelling gebruiken (High Performance NVIDIA-processor).
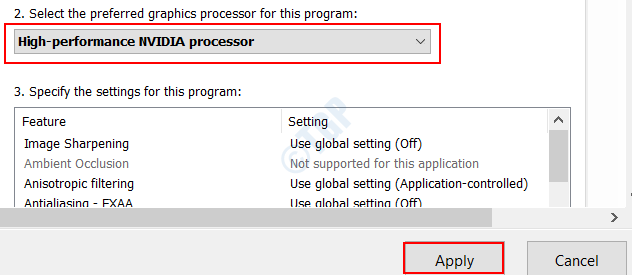
Click on the Apply button on bottom and then exit the window.
This will choose the option NVIDIA Processor as the default graphics card for your selected program.
If this works for the program you selected, then follow the same steps for different applications in your system
FIX 5 : Restore the Default BIOS Settings
Restoring the BIOS settings for the graphics card to default can help restore all the GPU settings in your system to their original state. This can help in many cases. To do so, follow the below given steps.
Step 1 : Search for the option Settings from Windows Start Menu and click on it.
Step 2 : Choose the option Update and Security on the page that lands up.
Step 3 : Now, in the left pane, you are required to choose the option Recovery.
Step 4 : On the right pane, you will find the option Restart Now under Advanced Startup.
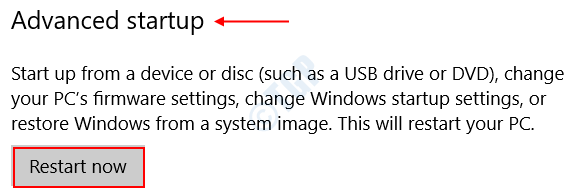
This will restart the system in a different mode rather than the normal one.
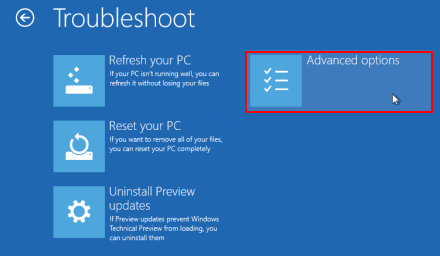
Step 5 : Once the system restarts, you will get a new screen different from the normal login screen. Now, choose the option Troubleshoot from a list under Choose an option menu.

Step 6 : Click on the option Advanced Options under Troubleshoot.
Step 7 : You are now required to choose the option UEFI Firmware settings from the options.
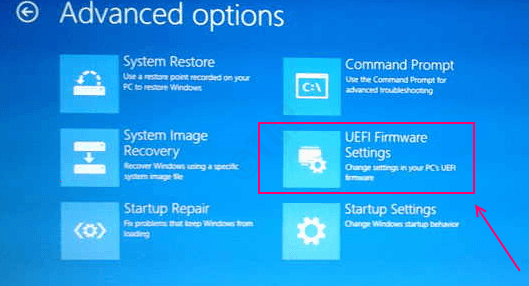
It will prompt you to restart the system. Go ahead with it.
Step 8 : You will find an option Restore Defaults under the tab Save and Exit. These options will differ from manufacturer to manufacturer.
Step 9 : Once you restore the defaults, all the application and program settings will be restored to its original set up. Exit the window and restart your system.
Check if any of the above given methods work out for you. Please feel free to comment in case of any queries.
">